The most common mistakes come down to three things: serial parameters that don't match the CNC controller, wrong COM port assignments in the DNC software, and WiFi interference causing incomplete program transfers mid-send. All three are preventable with the right sequence.
This guide covers the complete process — hardware selection, physical connection, adapter configuration, virtual COM port setup, DNC software integration, and validation testing before any live programs touch the machine.
Key Takeaways
- A serial-to-WiFi adapter plugs into the CNC's RS232 port and creates a wireless bridge to the shop network
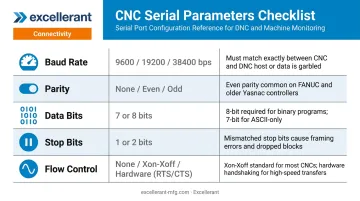
- Serial parameters (baud rate, parity, stop bits, data bits, flow control) must match the CNC controller exactly — no exceptions
- Virtual COM port software maps the adapter's network IP to a local COM port for the DNC software
- DNC software is pointed to that virtual COM port to send and receive G-code programs wirelessly
- Run a loopback test before sending any live programs to the machine
What You Need Before You Start
Confirm Your CNC Has an RS232 Port
Most CNC machines from brands like Haas, Fanuc, Fadal, Mazak, Okuma, and Mori Seiki have an RS232 serial port — typically a 9-pin (DB9) or 25-pin (DB25) connector. The Fadal CNC 88, for example, uses a 25-pin RS232 connector with documented pin assignments.
Check the connector on your specific machine before ordering hardware. The pin count and gender (male or female) determine which cable adapters you need.
Hardware Checklist
Essential:
- Serial-to-WiFi adapter — industrial-grade for shop floor environments (the Moxa NPort W2150A is a well-documented option with DB9 RS232, 802.11a/b/g/n, and a 0–55°C operating range)
- Null modem serial cable
- Gender changers or 25-to-9-pin adapters as needed
- PC with WiFi capability
Optional but recommended for multi-machine shops:
- Wireless router or access point for connecting multiple adapters to a single network
Record Your CNC's Serial Port Parameters First
Before touching any hardware, pull these five values directly from the CNC controller:
| Parameter | Why It Matters |
|---|---|
| Baud rate | Must match exactly — mismatches cause immediate communication failure |
| Parity | Even, odd, or none — must be identical on adapter and CNC |
| Data bits | Typically 7 or 8 |
| Stop bits | Typically 1 or 2 |
| Flow control | XON/XOFF (software) or CTS/RTS (hardware) — one of the most common failure points |
On a Haas controller, these are found under Settings: Setting 11 (Baud Rate), Setting 12 (Parity), Setting 13 (Stop Bits), and Setting 37 (RS-232 Data Bits). The Haas 2009 Mill Operator's Manual lists recommended DNC values as 19200 baud, no parity, 1 stop bit, and 8 data bits.
On a Fanuc controller, RS232 parameters are accessed through the parameter menu. Parameter 0020 selects the I/O channel, and parameter 0101 bit 0 controls stop bits (0 = 1 stop bit, 1 = 2 stop bits) — consult the parameter manual for your specific Fanuc series, as settings are not universal across models.
Write these values down. You'll enter them identically into the adapter during configuration.
How to Connect a CNC to a PC Over WiFi: Step-by-Step
The setup follows a defined sequence. Skipping or reversing steps is the most common reason connections fail. If this is your first time, budget 30–90 minutes per machine.
Step 1: Connect the Serial-to-WiFi Adapter to the CNC
- Identify the RS232 connector on the CNC — DB9 or DB25, and note whether it's male or female
- Attach the null modem cable between the CNC's serial port and the adapter's serial port, using gender changers or a 25-to-9-pin adapter if needed
- Power the adapter — most industrial serial-to-WiFi adapters require a DC power supply (the Moxa NPort W2150A, for example, accepts 12–48 VDC). Never power it from a USB port unless the adapter explicitly supports USB power
- Position the adapter close enough to the machine to avoid cable strain, but clear of moving parts and foot traffic
Step 2: Access and Configure the Adapter Settings
Once powered, the adapter broadcasts its own WiFi network by default. Connect your PC to that network, then open a browser and navigate to the adapter's default IP address. For the Moxa NPort W2150A/W2250A, the default WLAN IP is 192.168.127.254.
Log in and navigate to the serial port settings page. Enter the values you recorded from the CNC controller:
- Baud rate
- Parity
- Data bits
- Stop bits
- Flow control
Flow control deserves extra attention. This is one of the most common sources of dropped or incomplete transfers:
- XON/XOFF must be enabled in both the adapter settings and the DNC software. If either side has it disabled, the CNC can pause a transfer without sending a proper resume signal — the file transfers incomplete with no obvious error
- CTS/RTS depends on correct pin wiring. Confirm pin 7 (RTS) and pin 8 (CTS) are properly connected in the cable before relying on hardware handshaking
Save the settings and note any confirmation prompts — some adapters require a restart after serial parameter changes.
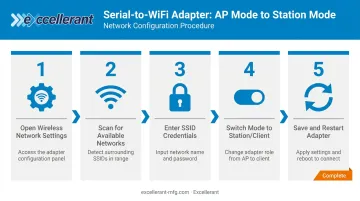
Step 3: Switch the Adapter to Station Mode (Recommended)
By default, the adapter operates as a standalone access point. In most installations, switch it to Station (STA) or Infrastructure mode so it joins the existing shop WiFi network. This lets a single PC communicate with multiple machines on the same network without swapping WiFi connections.
To do this:
- In the adapter's configuration interface, navigate to the wireless network settings
- Scan for available networks and select your router's SSID
- Enter the WiFi credentials
- Switch the mode from AP to Station/Client/Infrastructure (terminology varies by adapter brand)
- Save and restart the adapter
After restarting, the adapter will be assigned an IP address by your router. You must identify this new IP address before the next step — use the adapter's device search utility (Moxa provides the Device Search Utility for this purpose, which locates units by MAC address) or check your router's DHCP client list.
Setting Up the Virtual COM Port and DNC Software
Why a Virtual COM Port Is Necessary
DNC software communicates over a standard serial COM port. After switching the adapter to station mode, the connection is a network connection — not a serial one. Virtual COM port (VCOM) software bridges the gap by mapping the adapter's IP address and network port to a local COM port that the DNC software can open like a physical serial port.
Several tools handle this:
| Tool | Notes |
|---|---|
| Moxa NPort Windows Driver Manager | Vendor utility for Moxa adapters; COM ports appear in Windows Device Manager |
| HW-group HW VSP3 | Adds a virtual serial port (e.g., COM5) and redirects data via TCP/IP |
| Lantronix Com Port Redirector | Maps virtual COM ports for Lantronix adapters |
| com0com | Free, open-source GPL virtual serial port driver for Windows |
Creating the Virtual COM Port
- Open your VCOM software
- Add a new COM port (typically an "Add COM" or "Add Port" button)
- Enter the adapter's IP address (the one assigned by the router) and the adapter's listening port number (check the adapter's documentation — common default ports are 4001 or 950)
- Confirm and create the port
- Open Windows Device Manager and verify the new COM port appears under "Ports (COM & LPT)"
Write down the COM port number assigned. You'll need it in the DNC software.
Note: If you're using Moxa's driver, COM ports mapped through the NPort Administration Suite may not appear in Device Manager — use the NPort Windows Driver Manager instead to verify them.
Configuring the DNC Software
DNC software is the PC application that manages sending and receiving G-code programs to CNC controllers through the serial (or virtual serial) connection. It handles communication protocols, file revision control, and drip feeding of large programs — it's not CAM software and it's not a file browser.
According to Modern Machine Shop, DNC systems also support drip-feed mode, where files are received in portions as the controller's internal memory becomes available. This matters for large programs that exceed on-board storage.
To configure the DNC software:
- Open the communication settings for your machine in the DNC application
- Set the COM port to the virtual COM port number you just created
- Set baud rate, parity, data bits, stop bits, and flow control to match the CNC controller values
- Save and confirm the connection is active
That covers a single-machine setup. For shops running multiple machines, the process scales directly.
For multi-machine shops, create one virtual COM port per machine, each mapped to a different adapter IP address. The DNC software then selects the correct COM port when addressing a specific machine. Excellerant's wireless DNC platform handles this at the application layer — centralized NC file management, one-click revision comparison, and per-machine program transfer history are built into a single system, so there's no need to coordinate separate adapter utilities and standalone DNC applications manually.
Validating Your Wireless CNC Connection
Run the Loopback Test First
Before reconnecting the adapter to the CNC, perform a loopback test to confirm the adapter and virtual COM port are functioning correctly. According to NI's serial loopback documentation, the method for a DB9 RS232 port is to short pin 2 (RXD) to pin 3 (TXD) using a jumper wire or straightened paper clip.
Steps:
- Disconnect the adapter from the CNC's serial port
- Short pin 2 to pin 3 on the null modem cable connector
- Open a serial terminal application (AccessPort or Sealevel's WinSSD work well)
- Select the virtual COM port and send a test string
If the string echoes back, the adapter and virtual COM port are working. If it doesn't, the virtual COM port is misconfigured, the adapter IP/port is wrong, or the adapter isn't reachable on the network. Fix before proceeding.

Live Connection Checks
Once the adapter is reconnected to the CNC:
- Confirm the adapter's "Link" or "WLAN" indicator is active
- Verify the virtual COM port shows as "Open" in the VCOM software
- Send a short test program from the DNC software and confirm it appears on the CNC controller screen
Modern Machine Shop notes that wireless DNC requires rigorous data checking, and the software may need to resend data to preserve integrity. A 10-minute validation is worth the time: silent failures — where the software reports success but the CNC received corrupted or incomplete data — are what cause scrap parts and machine alarms.
Common Wireless CNC Connection Problems and How to Fix Them
Most wireless CNC connection problems fall into three predictable categories — and all are fixable without replacing hardware:
- CNC not receiving programs — serial parameter mismatch between adapter and controller
- Intermittent drops or incomplete transfers — RF interference or XON/XOFF misconfiguration
- Virtual COM port conflicts — another application has claimed the port
CNC Not Receiving Programs
Symptom: DNC software reports a successful send, but no program appears on the controller — or the controller shows a communication error.
Cause: Serial parameter mismatch, most often baud rate or flow control.
Fix: Return to the adapter's browser configuration page. Compare every serial parameter against the values noted directly from the CNC controller. Correct any discrepancy, save, and re-run the loopback test before retrying.
Intermittent Drops or Incomplete Transfers
Symptom: Communication starts but drops partway through, especially on larger files.
Cause: NIST identifies metal-working machine shops as harsh electromagnetic environments — metal enclosures, motors, and other wireless devices all contribute to interference and signal degradation. XON/XOFF misconfiguration is another common cause.
Fix:
- Reposition the adapter for better line-of-sight to the access point, or add a WiFi range extender closer to the machine
- Confirm XON/XOFF is enabled or disabled consistently in both the adapter settings and DNC software — one side enabled and the other disabled will cause incomplete transfers on larger files
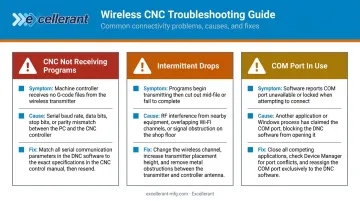
Virtual COM Port Won't Open or Is "In Use"
Symptom: VCOM software shows the port as created, but the DNC software can't open it, or the terminal application returns an "access denied" or "port in use" error.
Cause: Another application — a previous DNC instance, a Windows system process, or another serial utility — has claimed the COM port.
Fix:
- Close all applications that could access serial ports
- Open Device Manager and confirm the COM port is still listed
- If the conflict persists, assign a different COM port number in the VCOM software (Device Manager → Properties → Port Settings → Advanced)
- Reassigning to an unused port number typically resolves the conflict immediately
Frequently Asked Questions
How can files be transferred wirelessly to and from a CNC machine?
A serial-to-WiFi adapter connects to the CNC's RS232 port and joins the shop WiFi network. DNC software on the PC communicates through a virtual COM port mapped to that adapter's IP address, allowing G-code programs to be sent to and received from the CNC over the network.
What is DNC software for CNC machines?
DNC (Direct Numerical Control) software manages the transfer of CNC programs to and from machine controllers over a serial or network connection. It handles communication protocols, file revision management, and drip feeding of large programs that exceed the controller's onboard memory. Excellerant's DNC software has supported both wired and wireless connections since the company pioneered wireless DNC in 2001.
Can I connect multiple CNC machines wirelessly to one PC?
Yes. Each machine requires its own serial-to-WiFi adapter, and each adapter gets its own virtual COM port on the PC. The DNC software selects the correct COM port when addressing a specific machine.
Do all CNC machines support wireless WiFi connectivity?
Any CNC machine with an RS232 serial port can be connected wirelessly using a serial-to-WiFi adapter. This covers machines from Haas, Fanuc, Fadal, and many others. Machines without RS232 may require an alternative connection method.
What serial port settings do I need before setting up a wireless CNC connection?
You need five values from the CNC controller before configuring the adapter: baud rate, parity, data bits, stop bits, and flow control type (XON/XOFF software flow control or CTS/RTS hardware flow control).
How far can a CNC machine be from the PC with a wireless connection?
The Moxa NPort W2150A is rated for up to 100 meters in open areas, though metal enclosures and machinery on shop floors reduce that range considerably. Use WiFi repeaters or additional access points distributed through the shop to maintain reliable coverage near each machine.